
A Comprehensive Guide to Using Postman for API Testing
In the world of software development, APIs (Application Programming Interfaces) are the backbone that allows different software systems to communicate with each other. Ensuring these APIs function correctly is crucial, and that’s where tools like Postman come in handy. Postman is a popular API client that makes it easy for developers to create, share, test, and document APIs. In this guide, we’ll walk you through the basics of using Postman with practical examples.
Getting Started with Postman
Installing Postman
- Download Postman: Go to the Postman website and download the version compatible with your operating system.
- Install Postman: Follow the installation instructions specific to your OS.
- Sign Up / Log In: After installing, open Postman. You can create a new account or log in with your existing account.
Understanding the Interface
Postman’s interface is user-friendly and divided into several sections:
- Sidebar: Contains collections, APIs, environments, and other useful tabs.
- Request Builder: Where you create and manage your API requests.
- Response Viewer: Displays the response data from the API calls.
Making Your First API Request
Let’s make a simple GET request to a public API.
- Create a New Request:
- Click on the “New” button in the top left corner.
- Select “Request” from the dropdown.
- Name your request (e.g., “First GET Request”) and choose a collection to save it in, or create a new collection.
- Set Up the Request:
- In the request builder, set the method to GET.
- Enter the URL for the API endpoint you want to test. For example, use the JSONPlaceholder API:
https://jsonplaceholder.typicode.com/posts/1.
- Send the Request:
- Click the “Send” button.
- View the response in the Response Viewer. You should see a JSON object with the details of a post.
Example: Creating a GET Request
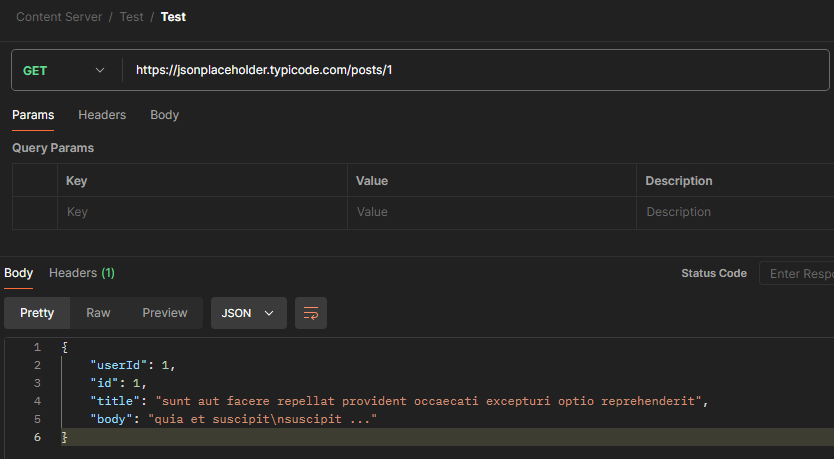
GET https://jsonplaceholder.typicode.com/posts/1
Response:
{
  "userId": 1,
  "id": 1,
  "title": "sunt aut facere repellat provident occaecati excepturi optio reprehenderit",
  "body": "quia et suscipit\nsuscipit ..."
}
Working with POST Requests
Next, let’s create a POST request to submit data to an API.
- Create a New Request:
- Follow the same steps as before to create a new request.
- Name your request (e.g., “Create New Post”).
- Set Up the Request:
- Set the method to POST.
- Enter the URL:
https://jsonplaceholder.typicode.com/posts. - Go to the “Body” tab and select “raw”.
- Choose “JSON” from the dropdown.
- Enter the JSON data you want to send. For example:
{
"title": "foo",
"body": "bar",
"userId": 1
}
- Send the Request:
- Click “Send”.
- View the response to see the result of your POST request.
Example: Creating a POST Request
POST https://jsonplaceholder.typicode.com/posts
Request Body:
{
  "title": "foo",
  "body": "bar",
  "userId": 1
}
Response:
{
  "title": "foo",
  "body": "bar",
  "userId": 1,
  "id": 101
}
Using Postman Collections
Collections in Postman are a way to group related requests. This is especially useful for organizing your API tests and sharing them with your team.
- Create a Collection:
- Click on the “New” button and select “Collection”.
- Name your collection (e.g., “My API Tests”).
- Add Requests to the Collection:
- When creating or editing a request, choose the collection you want to save it in from the save menu.
Running Tests with Postman
Postman also allows you to write tests using JavaScript to automate your API testing process. Here’s how to add a test:
- Open a Request:
- Go to the “Tests” tab of your request.
- Write a Test Script:
- Enter your test script in JavaScript. For example, to check if the status code is 200:
pm.test("Status code is 200", function () {
pm.response.to.have.status(200);
});
- Enter your test script in JavaScript. For example, to check if the status code is 200:
- Send the Request and View Test Results:
- Click “Send”.
- View the test results in the “Test Results” tab.
Conclusion
Postman is an incredibly powerful tool for API development and testing. By following this guide, you should now be able to perform basic API requests, organize your work using collections, and write simple tests to automate your API testing. As you become more familiar with Postman, you’ll find even more features and capabilities that can streamline your workflow and enhance your productivity. Happy testing!


Leave a comment