
How to Obtain an Authentication Token from a Content Server
In the realm of digital security, authentication tokens are essential for validating user access to content servers. They provide a secure method of authentication without exposing sensitive credentials. This guide will walk you through the process of acquiring an authentication token from a content server using Postman, a widely used API development tool.
Step-by-Step Process to Get an Authentication Token
Step 1: Install and Set Up Postman
- Download Postman: If you haven’t done so yet, download Postman from the official website and install it.
- Create an Account: Sign up for a free Postman account or log in if you already have one.
Step 2: Create a New API Request
- Open Postman: Launch the Postman application.
- New Request: Click on “New” and then select “Request”.
- Name Your Request: Give your request a descriptive name and save it in a collection for better organization.
Step 3: Set Up the Request
- Enter the URL: Input the URL for the authentication endpoint. This is typically provided in the API documentation of the content server. For example:
https://otsbd.ssbtdilnc.com/otcs/cs.exe/api/v1/auth - Choose HTTP Method: Select the
POSTmethod, as this is commonly used for authentication requests.
Step 4: Configure Headers
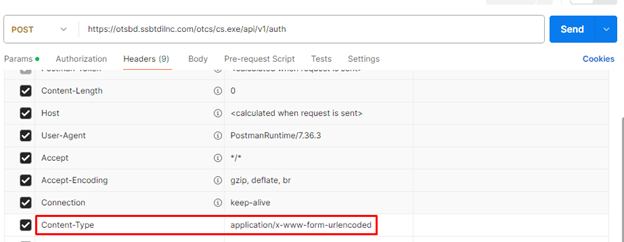
- Go to Headers Tab: Click on the “Headers” tab below the URL field.
- Add Content-Type Header: Include a
Content-Typeheader with the valueapplication/x-www-form-urlencodedto indicate that the request body will be in JSON format.Key: Content-Type Value: application/x-www-form-urlencoded
Step 5: Add the Request Body
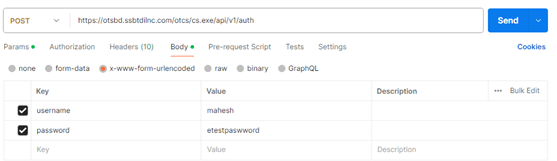
- Navigate to Body Tab: Click on the “Body” tab.
- Select x-www-form-urlencoded Format: Choose “x-www-form-urlencoded” and set the type to JSON.
- Input Credentials: Enter your authentication credentials as specified by the API documentation. A typical example is:
{
  "username": "your-username",
  "password": "your-password"
}
Step 6: Send the Request
- Send the Request: Click the “Send” button to execute the request.
- View the Response: The response from the server will be displayed in the lower part of the Postman interface. If the credentials are correct, you should receive an authentication token.
Step 7: Retrieve the Token
- Find the Token: In the response body, locate the authentication token. It’s usually found in a JSON field named
ticket.{ "ticket": "27SJu2qG5KHiIxCmKhmbpuj/lVLiohAgxVytTQq9TClv3P2qNDPBC7hiZmSpeGFIB31S6Njsa0OSGl1DLNdTVpBpz97vX38P" } - Copy the Token: Save the token for use in subsequent API requests.
Step 8: Use the Token for Future Requests
- Add Authorization Header: For future requests to the API, include the token in the
Headertab.Key: Content-Type Value: application/x-www-form-urlencoded Key: OTCSTICKET Value: 27SJu2qG5KHiIxCmKhmbpuj/lVLiohAgxVytTQq9TClv3P2qNDPBC7hiZmSpeGFIB31S6Njsa0OSGl1DLNdTVpBpz97vX38P - Make Authenticated Requests: Use Postman to send requests to other endpoints on the content server, ensuring each request includes the
Content-Typewith the token.
Conclusion
Securing an authentication token from a content server using Postman is a straightforward process. By following these steps, you can efficiently authenticate and interact with your server’s API. Always keep your tokens secure and avoid sharing them publicly.
Happy coding!


Leave a comment