
How to Set Up a Development Environment for SharePoint Framework (SPFx) Extensions on Windows
Setting Up a Development Environment for SharePoint Framework (SPFx) Extensions on Windows
In this blog post, we will walk through the process of setting up a development environment on a Windows machine for building SharePoint Framework (SPFx) Extensions. This environment setup is essential for developing custom solutions that interact with SharePoint Online or SharePoint on-premises. We’ll install the necessary tools like Node.js, Gulp, Yeoman, the SharePoint Framework generator, and additional libraries for React integration.
Prerequisites
Before beginning the setup, we need the following tools:
- Windows 10 or later operating system.
- Visual Studio Code or any preferred text editor.
- A SharePoint Online or SharePoint on-premises environment for testing the custom SPFx extensions.
Step 1: Install Node.js (Version 18.20.6)
To develop SharePoint Framework extensions, we need Node.js, a JavaScript runtime that powers SPFx development. For stability and compatibility with SPFx, we will use Node.js version 18.20.6. If you need help installing Node.js, check out this guide on How to Install Node.js Using NVM on Windows.
Instructions to Install Node.js:
-
Download Node.js:
Visit the Node.js official website and download the LTS version (18.20.6) for Windows. -
Install Node.js:
Run the downloaded installer and follow the on-screen instructions to install Node.js on the system. We should make sure that the installation includes npm (Node Package Manager), which is bundled with Node.js. -
Verify Installation:
Once the installation is complete, open the Command Prompt or PowerShell and verify the installation by checking the Node.js and npm versions with the following commands:node -vThis should return:
v18.20.6To verify npm, run:
npm -vThis should display the npm version installed on the system.
Step 2: Install Development Tools
Next, we will install a series of development tools that are essential for SPFx development. These tools include Gulp, Yeoman, and the SharePoint Framework generator, which we will use to scaffold SPFx solutions.
1. Install Gulp
Gulp is a task runner used in SPFx projects for automating tasks like bundling, minifying, and deploying solutions. We will install Gulp globally along with the Gulp CLI to run Gulp tasks from the command line.
Run the following command:
npm install -g gulp gulp-cli
Command Breakdown:
gulp- The core Gulp package, which provides the functionality to define tasks.gulp-cli- A command-line interface that helps run Gulp tasks in the terminal.
2. Install Yeoman and SharePoint Framework Generator
Yeoman is a scaffolding tool that generates project structures. It is widely used in the SharePoint development community to scaffold SPFx solutions. The SharePoint Framework generator will be installed using Yeoman and helps to scaffold SPFx projects.
Run the following command to install Yeoman and the SharePoint generator globally:
npm install -g yo @microsoft/generator-sharepoint
Command Breakdown:
yo- Yeoman’s command-line interface.@microsoft/generator-sharepoint- The official generator for creating SPFx projects.
3. Install PnP SPFx Controls for React
To make it easier to work with React components in SPFx solutions, we will install the PnP SPFx Controls for React package. This package includes reusable React components that simplify the development process.
Run the following command:
npm install -g @pnp/spfx-controls-react
Command Breakdown:
@pnp/spfx-controls-react- A library of pre-built React components designed specifically for SPFx development, created by the SharePoint Patterns and Practices (PnP) group.
Step 3: Verify Global Installations
At this point, we have installed all the necessary tools and packages. It is important to verify that the global installations were successful.
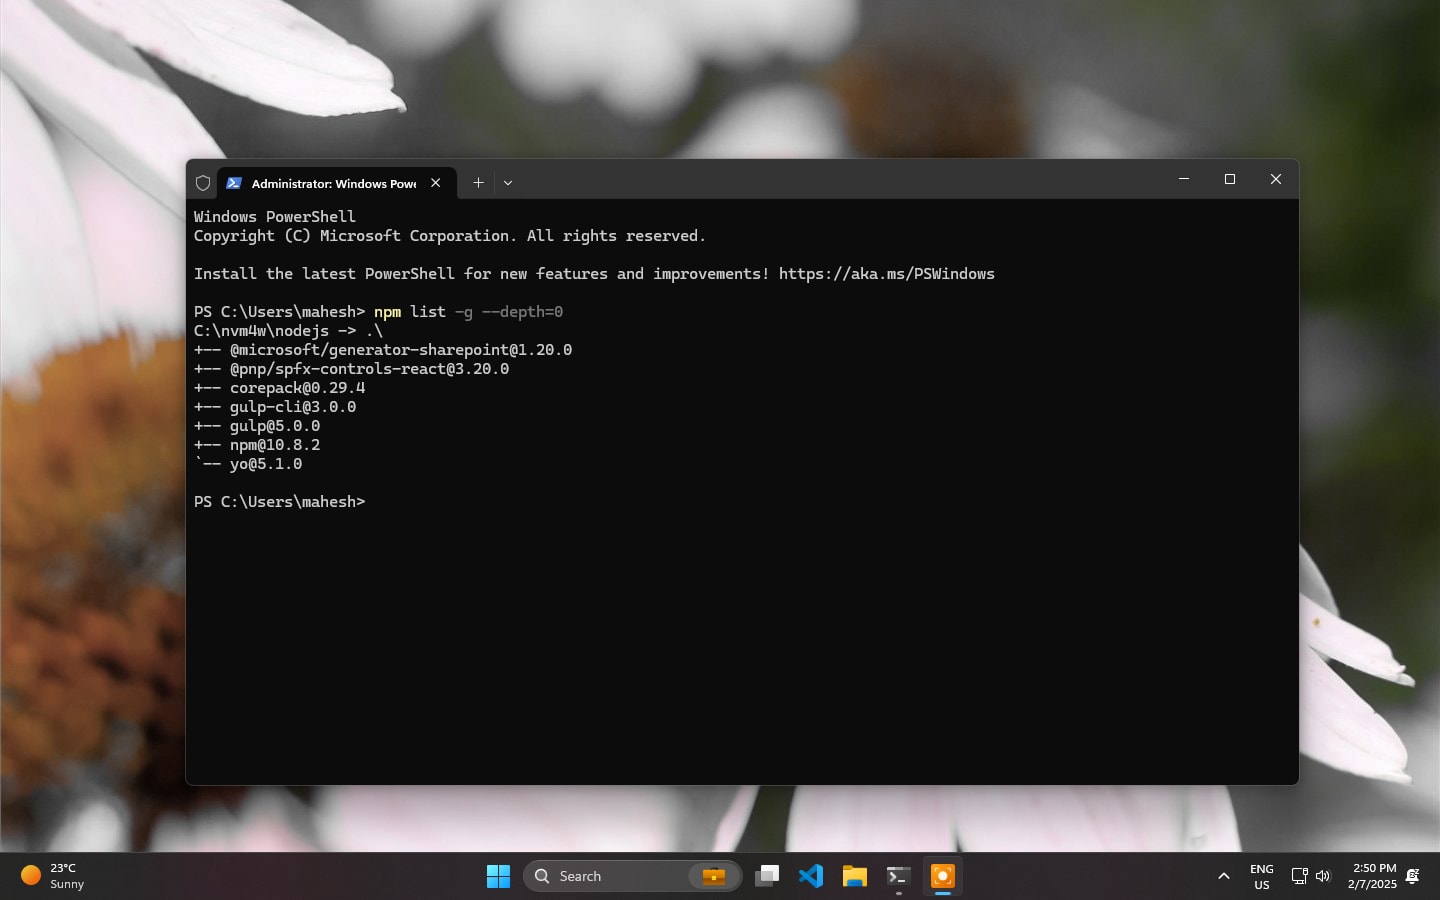
To do this, we can use the following command:
npm list -g --depth=0
Command Breakdown:
npm list -g- Lists all globally installed npm packages.--depth=0- Limits the list to top-level packages only, excluding nested dependencies.
Running this command in the Command Prompt or PowerShell will give us a list of globally installed packages, similar to:
C:\Users\username\AppData\Roaming\npm
├── @microsoft/generator-sharepoint@1.x.x
├── gulp@4.x.x
├── gulp-cli@2.x.x
├── yo@4.x.x
├── @pnp/spfx-controls-react@1.x.x
Important Note:
The npm list -g --depth=0 command might require administrative privileges. If we encounter any permission issues, we should run the command prompt as an Administrator. On Windows, right-click on Command Prompt or PowerShell and choose Run as Administrator. Alternatively, use sudo on macOS.
Step 4: Create a New SPFx Extension Project
With the development environment set up, we are now ready to create our first SharePoint Framework extension.
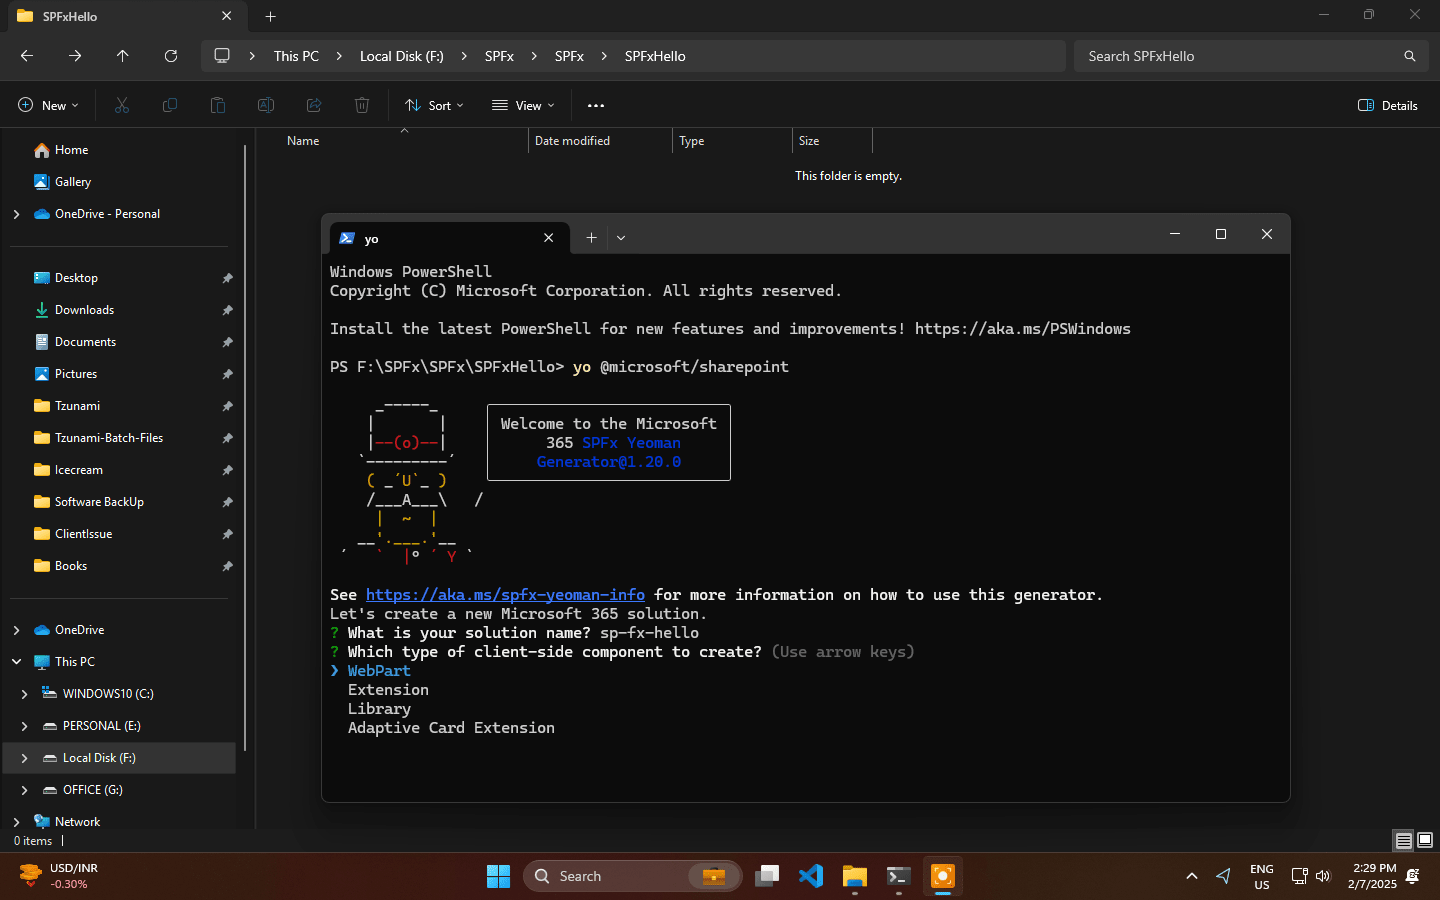
To generate a new SPFx project, we can use the Yeoman SharePoint generator. Simply run the following command:
yo @microsoft/sharepoint
This command will launch the SharePoint Framework generator, which will ask a series of questions to configure the project. Some of the options we will be prompted for include:
- What type of client-side component do you want to create?
- Which framework would you like to use? (For example, React, No JavaScript, etc.)
- What is the name of the project?
Answer the prompts based on the requirements of the extension we are developing.
Conclusion
We have successfully set up the development environment for SharePoint Framework (SPFx) Extensions on Windows. By installing essential tools like Node.js, Gulp, Yeoman, and the SPFx generator, we are ready to begin creating custom extensions for SharePoint.
With the environment ready, we can start creating SPFx solutions and building rich, dynamic user experiences for SharePoint users. Whether it’s a custom web part, list view command set, or application customizer, SPFx gives us the flexibility to extend and customize SharePoint to meet our specific needs.
Happy coding and good luck with your SharePoint Framework extension development!


Leave a comment