How to Clone a Git Repository and Configure Global User Settings in Visual Studio
If you’re new to Git and Visual Studio, you may wonder how to clone a Git repository and set up your user details (username and email) globally. These steps are essential for managing your commits and collaborating on projects. In this post, I’ll walk you through the process of cloning a repository and configuring your Git user information in Visual Studio. Let’s break it down step-by-step.
Step 1: Clone a Git Repository in Visual Studio
Cloning a Git repository means copying the code from a remote Git server (like GitHub, GitLab, or Azure DevOps) to your local machine so you can work on it.
Steps to Clone:
-
Open Visual Studio: Start Visual Studio and click on the “Clone a repository” option on the start screen.
- Enter Repository URL:
- Find the URL of the repository you want to clone. For example, on GitHub, go to the repository page and click the green “Code” button, then copy the URL (it should look like this:
https://github.com/username/repository.git). - In Visual Studio, paste the URL into the “Repository Location” field.
- Find the URL of the repository you want to clone. For example, on GitHub, go to the repository page and click the green “Code” button, then copy the URL (it should look like this:
- Choose a Local Path:
- Select a folder on your computer where the repository will be cloned. This is where your local copy of the project will live.
- Click “Clone”: After pasting the URL and selecting a location, click the “Clone” button. Visual Studio will then download the repository to your local machine.
Once the repository is cloned, Visual Studio automatically opens the project, and you’re ready to start coding!
Step 2: Configure Git Global User and Email in Visual Studio
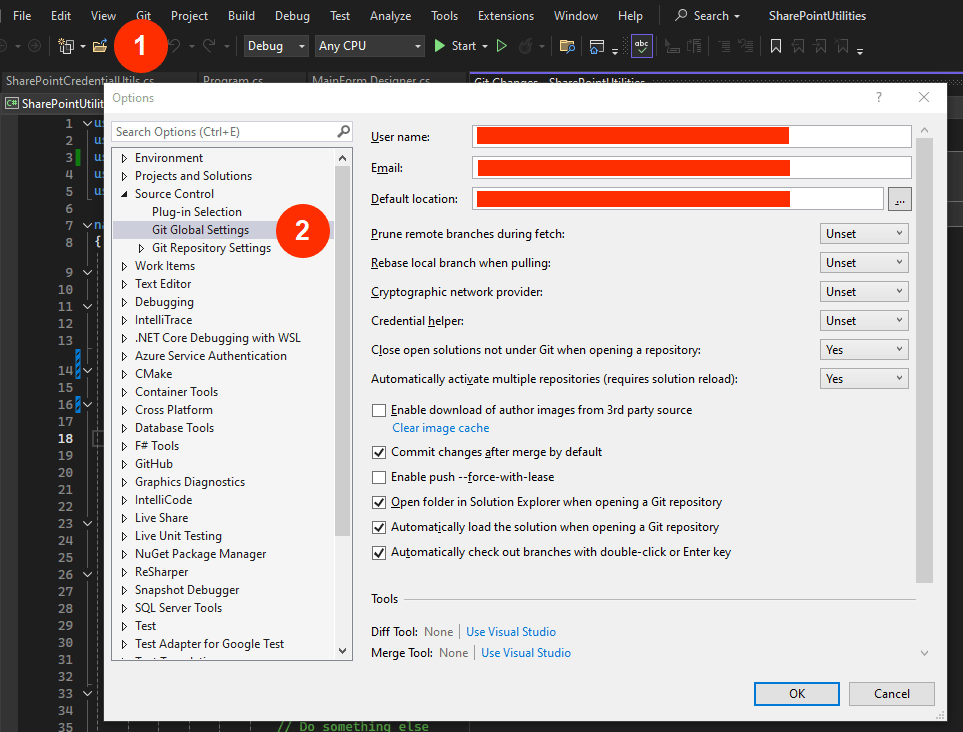
To ensure your commits are correctly attributed, you need to set up your global Git username and email. This configuration is crucial, especially when collaborating on projects, as it shows who made each change.
Steps to Set Up Git Global User and Email:
-
Open Visual Studio: Make sure your Visual Studio is open.
- Access Git Settings:
- Click on Git from the top menu.
- Select Git Global Settings from the dropdown.
- Configure Your Username and Email:
- In the settings window, you will see fields for Name and Email. This is where you will enter your global Git information.
- Enter your Name (this will appear as the author of commits).
- Enter your Email (this should be the email associated with your GitHub, GitLab, or other Git services).
- Save the Settings:
- After entering your details, click OK. This will apply your settings globally, meaning every project you work on using Git will use these details.

Example:
git config --global user.name "Your Name"
git config --global user.email "your.email@example.com"
This is the equivalent command if you were doing it from the command line, but Visual Studio handles this in its interface, making it easier.
Step 3: Verify Your Git Configuration
After setting up your username and email, it’s a good idea to check if the configuration is correct.
- Open Command Prompt or Terminal:
- You can open any terminal, whether it’s within Visual Studio or an external command prompt.
- Run the following command:
git config --global --list -
Check the Output: You should see your username and email listed, which confirms that Git has been correctly configured globally.
Example:
user.name=Your Name
user.email=your.email@example.com
Summary
In this post, we covered the basics of cloning a Git repository and configuring Git global settings in Visual Studio. Cloning a repository is simple and helps you work with projects locally, while configuring your Git username and email ensures that all your contributions are properly attributed to you.
By following these steps, you can seamlessly integrate Git with Visual Studio, making collaboration easier and your workflow more efficient.
Conclusion
Setting up Git in Visual Studio is straightforward, whether you’re cloning a repository or configuring your global Git user settings. These steps ensure your code is synced locally, and your commits are correctly attributed. Now you’re ready to collaborate on projects with your team or contribute to open-source projects!


Leave a comment